DataLift User Manual
How to turn a Purchase Order into a production-ready CSV.
01 Welcome
DataLift takes a Purchase Order from Zara or Bershka and helps you produce the CSV used to manufacture the labels. Instead of typing every field by hand, you upload the PO PDF, the composition document, and the screenshots from the label generator. DataLift reads them with AI, fills the form, and you review and correct anything that needs a human eye.
The process is split into six steps. You always move forward, but you can go back at any moment if you spot a mistake. Nothing is sent anywhere until you click Export in the last step.
Have ready: the PO PDF, the composition document, and the screenshots of the labels generated in the Inditex label generator. Without these inputs DataLift cannot produce a complete output.
02 Logging in
Open datalift.pages.dev in Chrome or Edge. Enter the email and password you were given. If you forgot the password, contact the administrator — there is no self-service reset.
Once inside, you land on the home screen. Click New Order to start processing a PO.
03 Step 1 — Setup
Tell DataLift which brand the order belongs to. This is the most important choice in the whole flow because it controls every downstream prompt, validation, and CSV column.
Pick one of:
- ZARA — then choose the sub-brand: Maag, Ecru, Vilet or Dub.
- BERSHKA — no sub-brand.
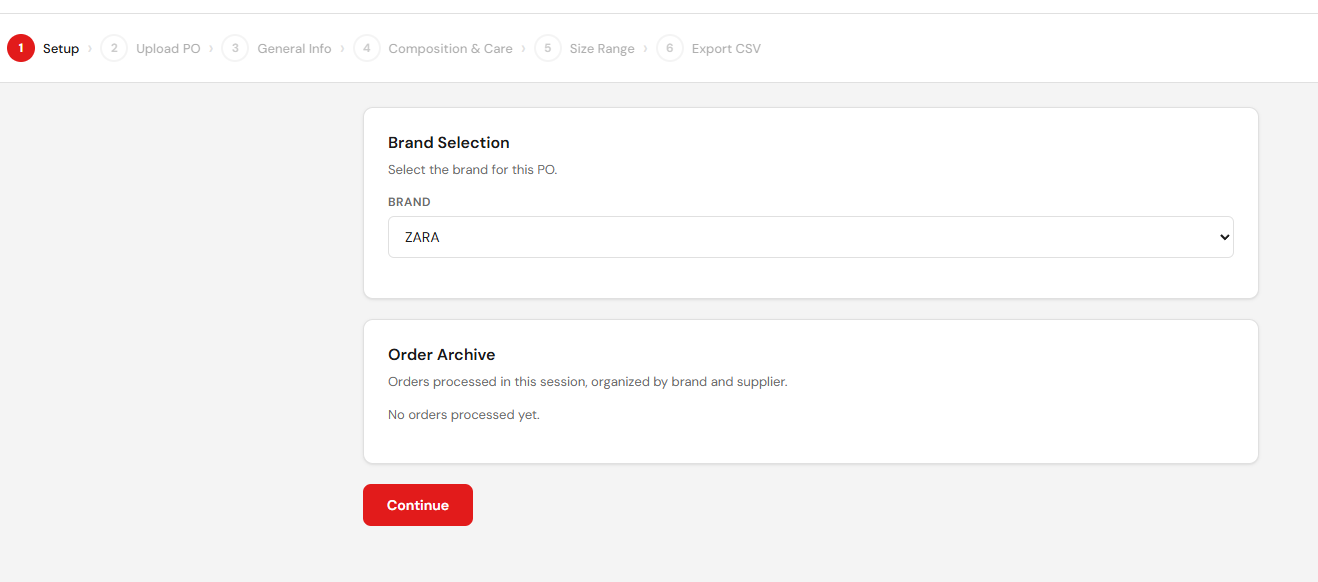
If you pick the wrong brand and continue, the AI will use the wrong prompt and most fields will come back incorrect. Going back to fix it forces a full reprocess.
04 Step 2 — Upload files
Step 2 shows four upload cards. The exact set depends on the brand you picked in Step 1. Fill the cards that apply to your order:
- PO — the Purchase Order PDF received from Inditex.
- Labels — the label reference list (when the customer provides one separately).
- Composition — the composition document for the garment.
- LG — the screenshots captured from the Inditex Label Generator tool.
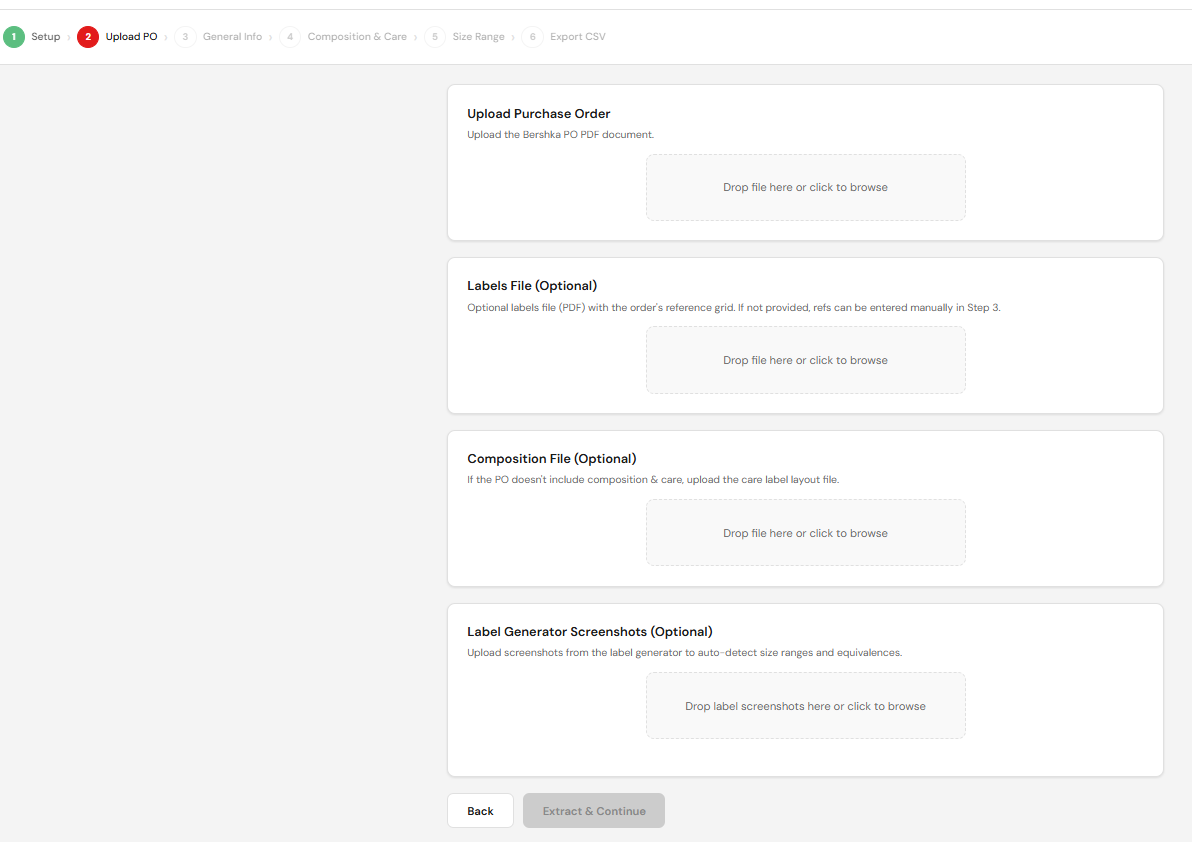
When the required cards are filled, click Process. DataLift sends the files to the AI and waits for the structured response. Typical processing time is 30 to 90 seconds depending on the size of the PO.
If you have several screenshots of the Label Generator (different labels in the same order), upload all of them in the LG card. DataLift matches each screenshot to its barcode automatically.
05 Step 3 — Review & references
This is the longest step. DataLift shows everything it extracted from the PO and asks you to review and complete the data before moving on. Step 3 has three areas you must check: the overview, the warning banner, and the label references.
Overview
The main view shows the data grouped into three blocks:
- General Information — order number, season, customer codes, destination and currency.
- Prices — unit prices by currency.
- Order Table — the full breakdown of references and quantities.
Read each block carefully. Every field is editable — correct anything that does not match the PO before continuing. The currency drives the hemisphere used in care labelling (GBP, USD and EUR are Northern; AUD, CLP and BRL are Southern), so do not skip it.
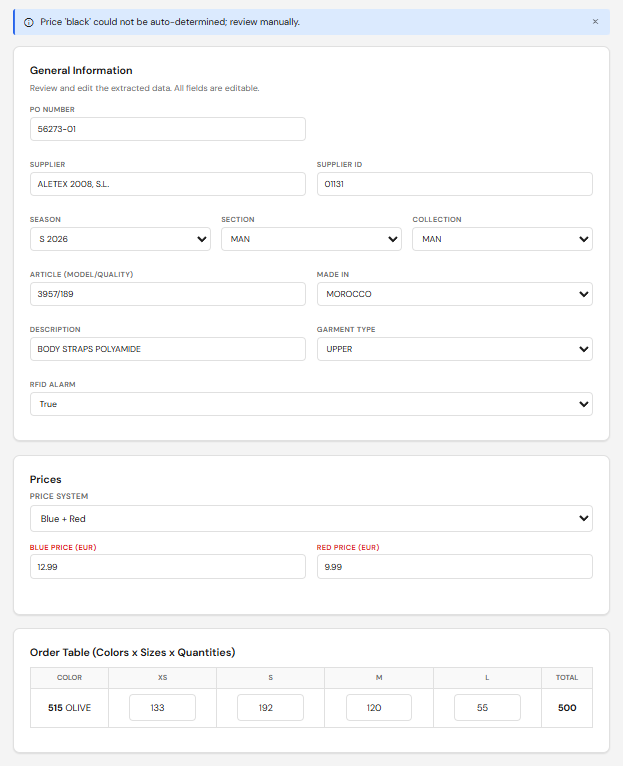
Warning banner
If the AI flagged anything for human review, a blue banner appears at the top of the page with one or more messages. Typical examples:
Price 'black'— a price field came back with an unexpected value.No label references— no references could be matched from the inputs.
Each message has a dismiss button. Read the message, fix the underlying data, and dismiss it. Do not dismiss a warning without fixing what it points to — the banner is the only place these issues are surfaced.

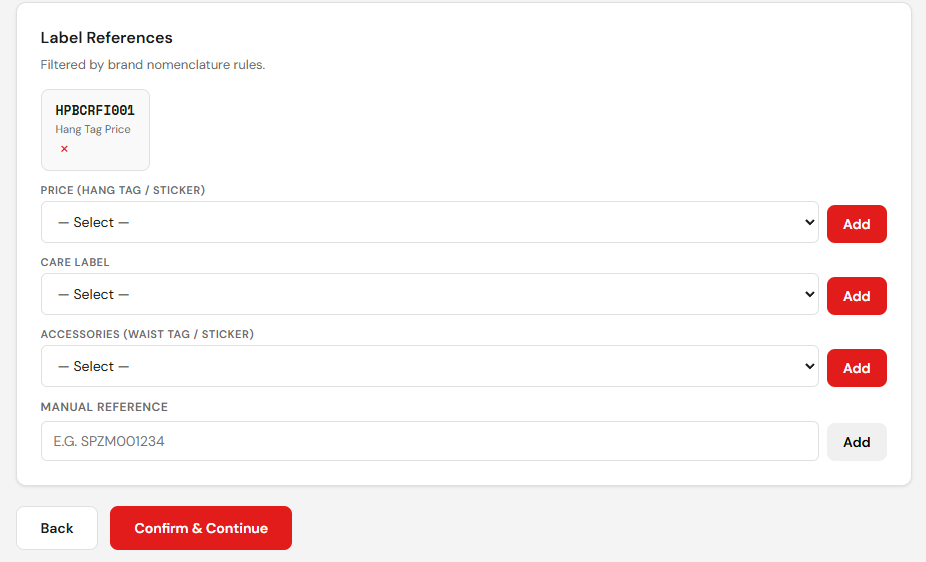
Label references
The Label References section is where you confirm the label codes that will go on the garment. It has:
- Three dropdowns — for the standard label slots. Pick the right code for each.
- Manual reference field — for any extra reference that is not in the dropdowns. Type it as it appears on the PO.
Valid references start with SP, HP, CL, ST or WT, and have Z as the third letter. DataLift filters out invalid prefixes (PL, WP, MR, RA) and the excluded range CLZCALL010–CLZCALL019 automatically.
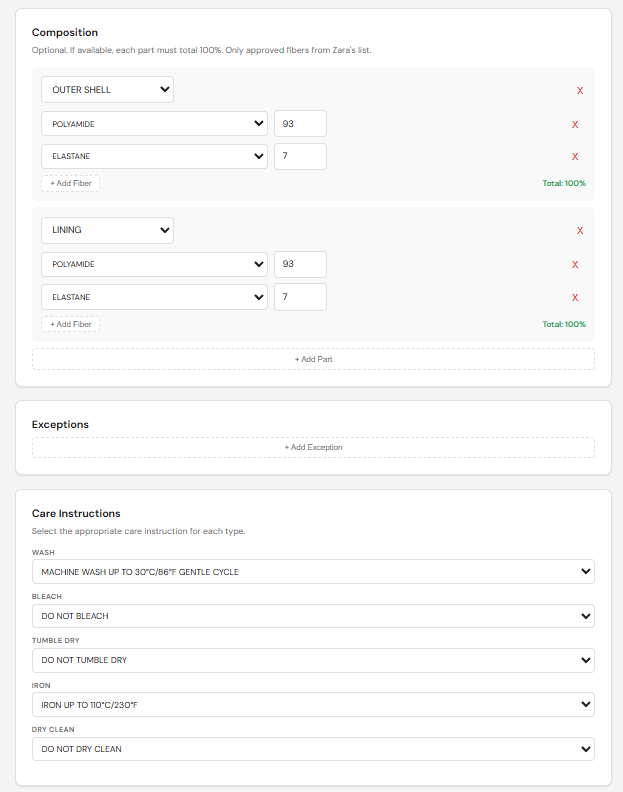
06 Step 4 — Composition & care
Step 4 covers two things on the same screen: the composition of the garment (split by part) and the care instructions.
Composition
- Use only the principal or aggregated composition. Ignore breakdowns of recycled fibres.
- Each part must add up to exactly
100%. - Multiple parts are separated by
|(space-pipe-space) when written into the CSV. - A typical garment has two parts (for example, body + lining). More are possible.
Care instructions
All care text appears in UPPERCASE English. The order of the icons follows the GINETEX standard:
- WASH
- BLEACH
- TUMBLE DRY
- IRON
- DRY CLEAN
If the source document uses the Korean KS K 0021 order (which swaps IRON and TUMBLE DRY), DataLift reorders the icons automatically. You do not have to fix this by hand.
07 Step 5 — Size range
DataLift lists every size present in the PO with the corresponding quantity. Check that:
- The sizes match the size range on the PO exactly. Missing or extra sizes mean the AI misread the table.
- Quantities add up to the PO total.
- Each size has the correct barcode and S.Code (positions 12 and 13 of the 14-digit barcode from the Label Generator).
If you uploaded Label Generator screenshots in Step 2, an extra Validation column appears showing whether each size matched a screenshot. If you did not upload LG screenshots, the column is not shown — that is normal.
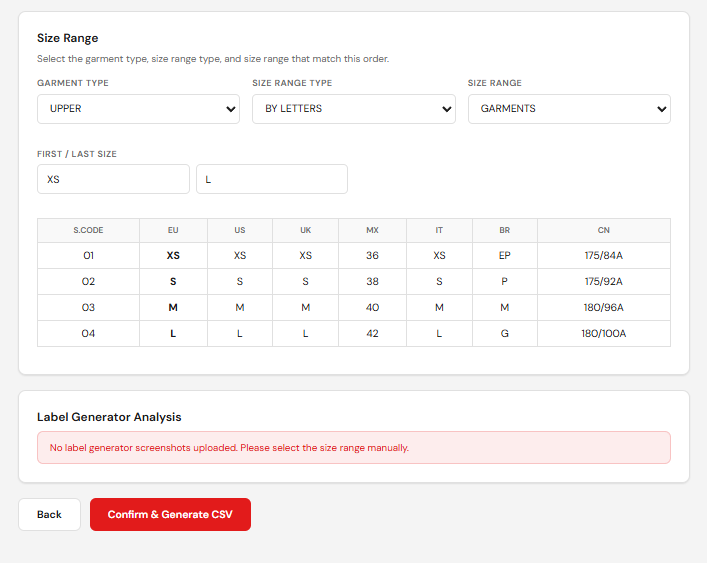
If you see a reference starting with PL, WP, MR, RA, or one inside CLZCALL010–CLZCALL019 here, something is wrong upstream. Go back to Step 3 and review the label references.
08 Step 6 — Export CSV
The final screen is the export. Confirm the summary looks right and click Export. The CSV is saved to your Downloads folder with a name based on the order number. Send it to production through your normal channel.
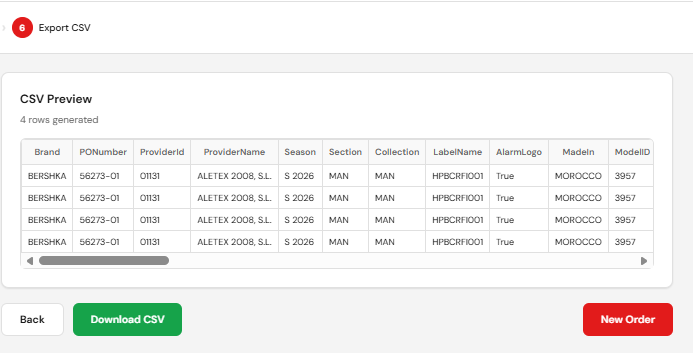
DataLift keeps a local archive of every order you process. You can open it from the home screen to review or re-export past orders without reprocessing.
09 Warnings
A few things will always cause trouble. Watch for them at every step.
The brand controls everything downstream. Changing it after Step 2 forces a full reprocess.
The Step 3 banner is the only place AI-flagged issues are surfaced. Dismissing without fixing produces a clean-looking but wrong CSV.
Production will reject the label. Fix the percentages before exporting.
The S.Code is positions 12–13 of the 14-digit barcode. If they do not match the screenshot, the AI matched the wrong screenshot to the wrong size.
DataLift normally fixes this, but if you see IRON before TUMBLE DRY in the output, fix it manually and report it.
Never email a CSV outside SML and never share screenshots that include customer barcodes. POs are confidential.
10 FAQ
No. One order per session. Finish or cancel the current one before starting another.
Process each garment as a separate order, with its own composition and its own Label Generator screenshots.
Some POs hide the destination country in the small print. Edit it manually in Step 3 — that is what the review step exists for.
Price 'black' in the warning banner mean?The AI returned a price field with an unexpected value. Open the Prices block in Step 3, find the row it refers to, and correct the price.
Yes, the file is plain text. But the recommended path is to fix the data inside DataLift, export again, and discard the bad CSV. That way the archive stays clean.
In the local archive, accessible from the home screen. The archive lives in your browser, so it is tied to the machine and browser you used to process the order.
No. It needs to reach the AI service to extract data from your files.
Chrome and Edge on Windows. Other browsers may work but are not tested.
11 Troubleshooting
| Symptom | Likely cause | Fix |
|---|---|---|
| Login fails with a correct password | Account disabled or wrong email | Contact the administrator. |
| Processing takes more than three minutes | Large PDF or AI service backlog | Wait. If it fails, retry once. If it fails twice, contact the administrator. |
| Warning banner shows "No label references" | References missing from the PO or not detected | Add them by hand in the Label References section of Step 3. |
| Composition shows 99% or 101% | AI misread a digit | Edit the percentages manually so each part sums to 100%. |
| A size is missing from Step 5 | AI missed a row in the PO size table | Go back to Step 2, reprocess. If it happens again, add the size by hand. |
| S.Code does not match the screenshot | Screenshots assigned in the wrong order | Re-upload the LG screenshots in Step 2 in the correct order. |
| CSV download does not start | Browser blocked the download | Check the browser’s download notification and allow it. |
| Archive is empty after closing the browser | Private/incognito window or cleared site data | Use a normal window and do not clear site data for datalift.pages.dev. |
12 Glossary
- PO
- Purchase Order. The document Inditex sends with the list of labels to produce.
- CSV
- Comma-Separated Values. The plain-text file format DataLift exports for production.
- LG
- Label Generator. The Inditex web tool that produces the barcode and reference numbers for each label.
- GINETEX
- European standard that sets the order and meaning of care symbols: wash, bleach, tumble dry, iron, dry clean.
- KS K 0021
- Korean care-labelling standard with a slightly different icon order. DataLift normalises it to GINETEX.
- Hemisphere
- Northern or Southern, derived from the destination currency. Affects which seasonal label is used.
- S.Code
- Positions 12 and 13 of the 14-digit barcode produced by the Label Generator. Identifies the size variant.
- Reference
- Label code on the PO. Valid prefixes: SP, HP, CL, ST, WT. The third letter must be Z.
- Sub-brand
- For Zara only: Maag, Ecru, Vilet or Dub. Determines the specific prompt and field set used by the AI.
- Manual review banner
- Blue banner at the top of Step 3 listing issues the AI could not resolve. Dismiss each message after fixing the underlying data.
- Order archive
- Local list of past orders kept in the browser. Survives reloads but not a cleared cache.